What Is a Dieline? A Packaging Guide for Brand Owners
A dieline is the flat, full-size template of a package before it is cut and folded. It shows where the material will be cut, where it will fold, where it will be glued or sealed, how far the artwork must extend past the edges (the bleed), and the area where text has to stay to be safe (the safe zone). Designers place the artwork on the dieline, and the printer uses the same file to make the cutting die and check the print.
In most projects the dieline comes from your printer or packaging converter, because it depends on their equipment, the material, and the exact size of your product. A label printer supplies one for labels, a pouch converter for pouches, a carton printer for boxes. Your job as the brand owner is to get the right dieline to your designer before the design starts. A beautiful concept drawn on a guessed template is the most common reason packaging has to be redone.
At SOTDESIGN we build every concept on the real dieline from the first round and deliver print-ready files to your printer’s specifications. We design only and don’t print, so the dieline always comes from your supplier.
What the lines on a dieline mean
There is no universal color code. Every printer adds a legend to its dielines, so read that first. The lines you will see on almost every template:
| Line or area | What it shows | What it means for the artwork |
|---|---|---|
| Cut line | Where the die cuts the material | Usually a solid line; the outer edge of the pack |
| Fold or crease line | Where the material is scored and folded | Usually dashed; keep text and fine detail off it |
| Perforation | A tear line, such as an easy-open strip | Keep important text away; it will be torn |
| Bleed | Artwork extended past the cut line | Prevents thin white edges when the cut shifts slightly |
| Safe zone | The area inside the cut and folds | All text, logos, and barcodes stay inside it |
| Glue area | Where panels are glued together | Often left without ink or varnish so the glue holds |
| Seal area | On pouches and flow wraps, where film is heat-sealed | Artwork there can look bumpy or slightly distorted; let the background run through, but keep text, logos, and barcodes out |
Printers set the bleed and safe zone in their specs, often around 1/8 inch, sometimes more for pouches and large cartons. Use the numbers from your printer, not a general rule.
How to read a dieline
Open the file and find the legend first. Then go in this order:
- Find the front panel. Printers often label it; if not, ask. Everything else is placed relative to it.
- Trace the folds. Imagine the box or pouch closing. Which panel ends up on top, which on the bottom, which edge meets the glue flap.
- Check the direction. Panels that end up upside down on the flat file are normal for many boxes. Mark “this way up” on each panel before laying out text.
- Measure the panels. The front of a 12-ounce cereal box and the front of a bar wrapper need very different hierarchies. Panel sizes decide how much copy fits.
- Note what can’t be printed. Glue areas, seals, windows, and any spot reserved for lot codes and dates printed on the packing line.
When in doubt, print it at 100%, cut it out, and fold it. Five minutes with scissors answers most questions about a dieline.
Where required label information goes
FDA labeling rules talk about panels, and the dieline is where those panels become real. Two of them matter most (21 CFR 101.1 and 101.2):
- Principal display panel. The panel most likely to be seen at retail, usually the front. It carries the product name (the statement of identity) and the net quantity, which generally goes in the bottom 30% of the panel, parallel to the base of the package.
- Information panel. The panel immediately to the right of the principal display panel as the shopper faces it. This is where the Nutrition Facts, ingredient list, allergen statement, and the name and address of the manufacturer or distributor usually go, kept together without unrelated artwork in between. Keep the barcode outside this block, because FDA treats it as intervening material.
On a box dieline, “to the right” is easy to get wrong when the panels are laid out flat and some are upside down. Mark the principal display panel and the information panel on the template before the layout starts. If the panel to the right is too small, the rules allow the next panel to the right to be used. For more on what each panel must carry, see our food label requirements guide.
How a dieline works in a packaging project
The dieline connects three people who rarely sit in the same room: the person who designs the structure, the designer who makes the artwork, and the printer who cuts and folds it.
- The structure is chosen. A stock shape from the printer’s catalog (a standard tuck-end box, a stock pouch size) or a custom structure designed for your product.
- The printer or converter sends the dieline, usually as a vector file (PDF, AI, or EPS) with dimensions and a legend.
- The designer works on it. Every panel is laid out where it really sits, so the front faces front and the nutrition panel lands on the side, not on the glue flap.
- A physical check. Print the design to scale, cut it out, and fold it. For anything custom, ask the converter for a blank sample.
- Print-ready files are prepared on the same dieline, with the printer’s color setup and marks, and sent for a proof.
If the dieline changes after design has started, the artwork usually has to be rebuilt around it. This is why we ask for the dieline in the brief, before concepts. Our guide to the packaging design process shows where this step sits in the full timeline.
Dielines for different formats
Folding cartons and boxes
A box dieline looks like an unfolded cross: front, back, two sides, top and bottom flaps, tuck flaps, and a glue flap. The two things that cause the most mistakes are orientation and the glue flap. Panels that look upside down on the flat file are often right side up once folded, and the glue flap is easy to forget until a logo disappears under it. Windows are marked as a cut-out with their own bleed.
Pouches and flow wraps
A pouch dieline shows the front and back panels, the bottom gusset, the side or top seals, and, if the pouch has them, a zipper, tear notch, hang hole, and window. Seal areas are pressed under heat, so artwork there can look bumpy or slightly distorted. Pouch film is printed on a roll and then cut, so the converter often adds an eyemark, a small solid block the machine reads to cut in the right place. Leave the space where they ask for it.
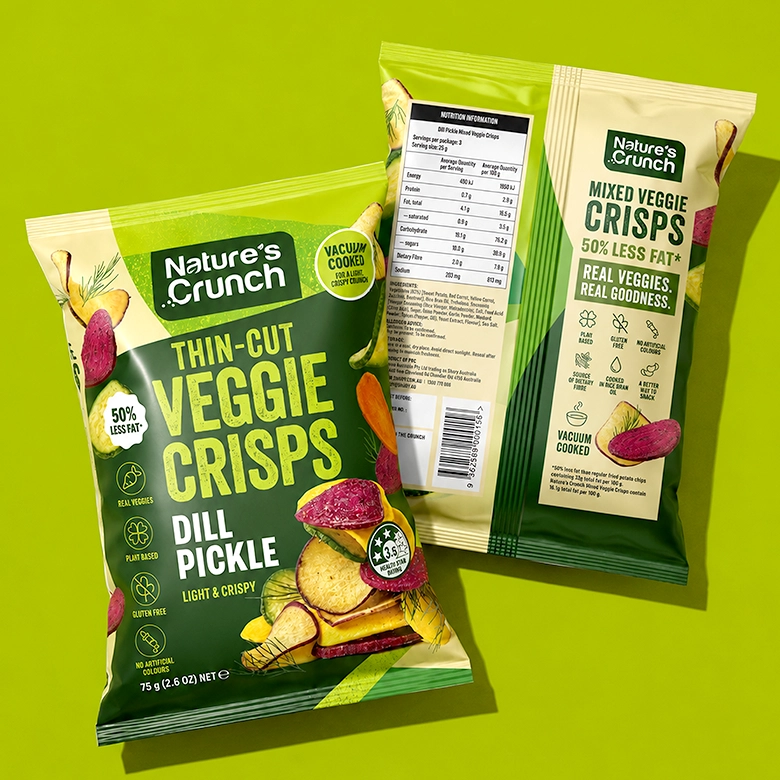
A mixed veggie crisps line we designed for Nature’s Crunch is a good example of a pouch system: five flavors on one template, each with its own color, with the flavor name and product photo kept well away from the seals and the gusset fold.
Labels and sleeves
For labels, the dieline is the label shape and size, including corner radius. For a wraparound bottle label it also shows the overlap and the area that will curve out of sight. A label that looks perfect flat may have the flavor name on the side of the bottle no one sees. Put the front design at the center of the visible face and test it on the real bottle or jar.
Label printers often keep dies from earlier jobs. If your label can fit one of their existing shapes, you skip the cost of a new die. Ask for their list of stock shapes before the design starts. For a craft beer example, see our John Barleycorn label, designed to the exact shape and wrap of the can.

Cans, tubes, and other printed containers
Printed cans, tubes, and some bottles also come with a flat template from the manufacturer. The artwork is printed flat, then formed or wrapped, so any image that crosses the seam has to line up. Treat the seam like a fold: no text on it.
What to ask your printer for
Before the design starts, send your designer these files and answers. You can include them in your packaging design brief.
- The dieline as a vector file at full size, with a legend for the lines.
- Bleed and safe zone measurements.
- The material and finish, such as white board, kraft, metallized film, clear label stock.
- The print method and color setup: process colors, spot colors such as Pantone, white ink under the artwork on clear or metallic materials.
- Where the barcode can go and how large it can be.
- Areas to keep free of ink or varnish (glue, seals, codes printed on the line).
- For pouches: the eyemark position, fill line, and any window or zipper.
- The version or date of the dieline, so everyone knows which file is current.
If your printer isn’t chosen yet, get the dieline from a supplier you are likely to use, or ask your designer to start with structure and concepts only and hold the final layout until the template arrives.
have a dieline and need the design?
send us your template and products: concepts on the real dieline, print-ready files for your printer
get quoteCan you make your own dieline?
You can, but for most brands it’s better not to. Structural designers use specialized software and know how the material behaves: board thickness changes where a fold sits, and a box sized to the product to the millimeter may not close. Online dieline generators are useful for a first idea of the shape and for mockups, but the printer will still want to send its own template, matched to its dies and material.
If you need a custom structure, a structural designer or the converter’s engineering team draws it, makes a blank sample, and then the dieline goes to the graphic designer. If you use a stock structure, the printer simply sends the template.
Common dieline mistakes
- Designing before the dieline arrives. The most expensive one. A layout made for a guessed size rarely survives the real template.
- Text on folds, seals, or seams. It cracks, distorts, or hides. Keep it inside the safe zone.
- Forgetting the glue flap or the overlap. A logo or claim ends up under another panel.
- Barcodes in the wrong place. On a fold, on a curved edge, too small, or without enough empty space around it, so it scans badly at the register.
- No bleed. Thin white edges appear when the cut is slightly off.
- An old version of the template. The printer changed the size; the designer used last month’s file.
- No physical test. A printed paper mockup or a blank sample catches problems that a screen never shows.
Dieline vs dyeline
The words sound alike but mean different things. A dieline is the packaging template described above. A dyeline is an older term for a copy of a technical drawing made with a light-sensitive process, similar to a blueprint. If you see “dye line” written about packaging, it is almost always a spelling mistake for dieline.
What it costs and who pays
The dieline itself is usually part of the printer’s or converter’s service when you order from them. A custom structure can add structural design fees and the cost of a new cutting die, which varies by size and complexity. Stock structures avoid both.
On the design side, working on your dieline is part of the packaging project, and the fee doesn’t change with the template: a packaging system with its first SKU costs from $2,500, a label from $1,500, and extra SKUs in an existing system cost about $800 each. See packaging design cost for what moves the price.
When you’re ready to start, our packaging design and label design pages show how we work and what you get.
ready to put your design on the dieline?
design only, files to your printer’s specs · fixed estimate in 1-2 business days
get quoteFAQ
01 What is a dieline in packaging?
A dieline is the flat, full-size template of a package that shows where it will be cut, folded, glued, or sealed, plus the bleed and the safe zone for text. Designers place artwork on it, and the printer uses it to make the cutting die.
02 Who makes the dieline?
Usually your printer or packaging converter, because it depends on their equipment, the material, and your product size. For custom shapes, a structural designer creates it first. Your graphic designer works on the dieline they receive.
03 What is a dieline for labels?
For labels, the dieline is the label’s shape and size, including corner radius, and for wraparound labels the overlap and the part that curves out of view. The label printer supplies it, often based on dies they already own.
04 How do I create a dieline?
For a stock box, pouch, or label, ask your printer for their template. For a custom structure, work with a structural designer or the converter’s engineering team, who will draw it in specialized software and make a blank sample before the artwork starts.
05 What file format should a dieline be?
A vector file at full size, usually PDF, AI, or EPS, with the dieline on its own layer and a legend for the line types. Raster files such as JPG or PNG aren’t precise enough for cutting.
06 How is a dieline different from a mockup?
A dieline is the flat technical template used for production. A mockup is a picture of the finished package, used to review the design. Good mockups are built from the real dieline, so what you approve is what gets printed.